front article
null
2017/06/05
准则 先说一下redux的使用场景,因为如果没有redux,那更不会有redux-form。
redux基于Flux架构思想,是一个状态管理框架,其目标是解决单页面应用中复杂的状态管理问题。
日常前端开发中,如果只是做一个简单的运营活动页面,甚至是一些路由稍微复杂一些的SPA项目,都可能用不到redux;只有在页面存在多种数据来源,交互非常复杂的项目中,才有必要引入redux。
redux的作者Dan Abramov指出:
“只有遇到 React 实在解决不了的问题,你才需要 redux 。”
前些日子开发的转转魔方系统,用于搭建转转日常的运营活动页面,因组件较多,交互复杂,采用了React+redux架构。先上一张“高大上”的截图(当然后台布局、配色可以忽略,因为没有UI资源,是我自己瞎搞的):
辣么,为什么采用redux-form呢?
相像一下,如果用state来保存要提交的数据,用onChange来获取用户输入,然后改变state中相应数据荐,简直是梦魇一般。
幸亏,我们有redux和redux-form,redux用来管理状态,redux-form来负责表单数据部分。
本文不介绍redux,如果想了解关于redux的更多,可以移步http://www.redux.org.cn/ http://www.ruanyifeng.com/blog/2016/09/redux_tutorial_part_one_basic_usages.html
好了,废话说了一大堆了,现在让我们进入正题:
redux-form主要做以下4件事:
一个 redux reducer,监听redux-form派发出的actions,统一管理我们redux中的form state;
一个React组件装饰器,包含我们用高阶组件组装的整个form,提供一个带一些props的纯函数;
一个Filed组件将用户输入与redux store相连接;
用单个的Action Creator将我们的form与应用挂勾在一起。
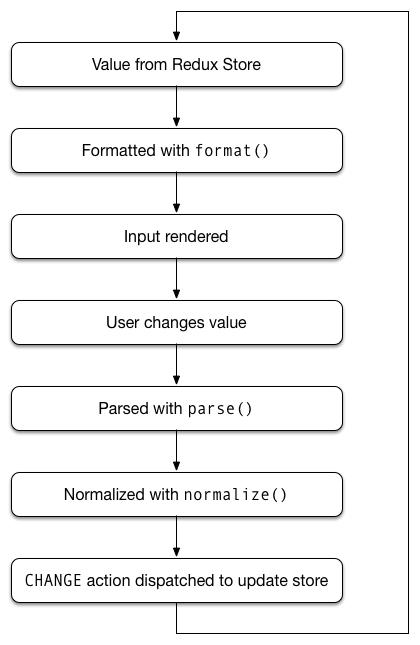
先来了解一下redux-form的生命周期:
基本用法 必须要做的第一步,是先把redux-form的reducer用combineReducer方法给到redux。不管我们的应用中有多少form组件,我们只需要执行一次这样的操作:
1
2
3
4
5
6
7
8
9
import { createStore, combineReducers } from 'redux' ;import { reducer as formReducer } from 'redux-form' ;const reducers = { form: formReducer } const reducer = combineReducers(reducers);const store = createStore(reducer);
请注意,传递给redux-form的默认key为form,虽然支持自定义key names,但一般情况下请勿修改这个名字。详见http://redux-form.com/6.7.0/docs/api/ReduxForm.md/#-getformstate-function-optional- 。
第二步,将普通表单组件用reduxForm()方法装饰,如此一来我们的组件才会拥有form state和一些表单方法。
1
2
3
4
5
6
7
8
9
10
11
12
13
14
15
16
17
18
19
20
21
22
23
24
25
26
27
28
29
30
31
32
33
34
35
36
import { Field, reduxForm } from 'redux-form' ;const SimpleForm = props => const { handleSubmit, pristine, reset, submitting } = props; return ( <form onSubmit={handleSubmit}> <div> <label>First Name</label> <div> <Field name="firstName" component="input" type="text" placeholder="First Name" / > </div> </ div> <div> <label>Last Name</label> <div> <Field name="lastName" component="input" type="text" placeholder="Last Name" / > </div> </ div> </form> ); } export default reduxForm({ form: 'simple', })(SimpleForm);
请注意:const { handleSubmit, pristine, reset, submitting } = props中的各项并`不是从它的父组件传过递,而是从redux-form传递过来。
pristine、submitting分别可以标识表单的当前状态。输入、获取、失去焦点等
我们也可以主动告诉redux-form我们希望管理哪些输入:
1 const { fields : { name, address, phone }, handleSubmit } = props;
初始化数据 在日常前端开发过程中,尤其是后台OA中,经常会遇到新增和编辑页面,此时如果建两个页面(或者用两个不同View的路由),无疑会增加日后维护成本(学习React之初踩过这个坑),所以初始化数据尤为重要。
redux-form提供initialValues,以供表单初绍化数据。
官网中的初始化数据来自reducer(Reducer设计优雅的基础上,推荐此方法):
1 2 3 4 5 6 7 8 9 10 11 InitializeFromStateForm = reduxForm({ form: 'initializeFromState' })(InitializeFromStateForm) InitializeFromStateForm = connect( state => ({ initialValues: state.account.data }) )(InitializeFromStateForm)
当然我们的数据也可能来自props(理论上数据应该完全放到一个store中,但实际项目开发过程中却未必——我们还是会用到setState,因为某个state可能只是特定组件的一个开关,没有必要放到store中)。
转转魔方系统中的页面配置初始数据就是来自props:
1
2
3
4
5
6
7
8
9
const ConfigBoxForm = reduxForm({ form: 'configForm' , })(ConfigBox); export default connect( (state, ownProps) => ({ initialValues: ownProps.data, }), )(ConfigBoxForm);
数据校验 数据校验是表单操作中必不可少的一部分,redux-form为我们提供了3种数据校验方法:
同步验证,包含Field-Level校验;
提交数据合法性验证(非数据格式,如用户名+密码是否匹配等);
异步验证(Async Validate)
同步验证 同步验证有两种方式。
通过一个自定义的验证函数,这个函数默认会传入携带表单字段值组成的一个object,返回对象为一个error组成的object对象 。
在Field组件中传入一个validate的props,把需要验证的字段单独或者以数据形式传入。
以自定义验证函数为例:
1 2 3 4 5 6 7 8 9 10 11 12 13 14 15 16 17 18 19 20 21 22 23 24 25 26 const validate = (values ) => { const errors = { content: {}, }; if (!values.content.src) { errors.content.src = '请选择图片' ; } return errors; }; const validate = (values ) => { const errors = { content: [], }; values.content.forEach((item, index ) => { if (!item.src) { errors.content[index] = { src: '请选择图片' }; } }); return errors; };
redux-form的验证还支持warning,该警告不阻止表单提交,只给出提示
1
2
3
4
5
6
7
const warn = values => const warnings = {}; if (values.age < 18 ) { warnings.age = '不满18岁' ; } return warnings; }
跟初始化数据一样,验证规则同样需要通知redux-form:
1
2
3
4
5
export default reduxForm({ form: 'syncValidation' , validate, warn })(SyncValidationForm)
提交数据合法性验证(英语不好,官方叫Submit Validation,根据Demo示例我给引申了一下) 用redux-form做服务端的推荐方式,是从onSumit方法中返回一个失败的(rejected)promise。
在表单的提交函数中,redux-form也提供了两种方式来校验:
通过props中的onSumit函数传递给装饰组件;
通过参数中的this.props.handleSubmit将form做为该函数的实参传递,可以在组件内部使用onClick={this.props.handleSubmit(mySubmit)}来代替提交按扭的默认提交事件。
submit.js
1
2
3
4
5
6
7
8
9
10
11
12
13
14
15
16
17
18
19
20
21
22
23
24
import {SubmissionError} from 'redux-form' ;const sleep = ms =>new Promise (resolve =>function submit (values ) return sleep(1000 ).then(() => if (!['john' , 'paul' , 'george' , 'ringo' ].includes(values.username)) { throw new SubmissionError({ username: 'User does not exist' , _error: 'Login failed!' }) } else if (values.password !== 'redux-form' ) { throw new SubmissionError({ password: 'Wrong password' , _error: 'Login failed!' }) } else { window .alert(`You submitted:\n\n${JSON .stringify(values, null , 2 )} ` ); } }) } export default submit;
在装饰组件中这样触发:
1 2 3 4 5 6 7 8 9 10 11 12 13 14 15 const SubmitValidationForm = props => const {error, handleSubmit, pristine, reset, submitting} = props; return ( <form onSubmit={handleSubmit(submit)}> <Field name="username" type="text" component={renderField} label="Username" /> </form> ); };
异步验证(Async Validation) 服务端异步验证最好的方式是Submit Validation,有时候在我们输入表单后,会即时的进行服务端验证,比如注册的时候验证用户名是否已存在。
asyncValidate通常也返回一个error或者resolve的reject对象。
asyncValidate.js
1
2
3
4
5
6
7
8
9
10
11
12
const sleep = ms =>new Promise (resolve =>const asyncValidate = (values /*, dispatch */ ) => { return sleep(1000 ).then(() => if (['john' , 'paul' , 'george' , 'ringo' ].includes(values.username)) { throw {username : 'That username is taken' }; } }) } export default asyncValidate;
validate.js省略
AsyncValidationForm.js
1
2
3
4
5
6
7
8
9
10
11
12
13
14
15
16
17
18
19
20
21
22
23
24
25
26
27
28
29
30
31
32
33
34
35
36
37
38
import asyncValidate from './asyncValidate' const renderField = ({ input, label, type, meta: {asyncValidating, touched, error} }) => ( <div> <label>{label}</label> <div className={asyncValidating ? 'async-validating' : ''}> <input {...input} type={type} placeholder={label} / > {touched && error && <span > {error}</span > </div> </ div>); const AsyncValidationForm = props => const {handleSubmit, pristine, reset, submitting} = props return ( <form onSubmit={handleSubmit}> <Field name="username" type="text" component={renderField} label="Username" /> </form> ) }; export default reduxForm({ form: 'asyncValidation', validate, / /普通校验,代码已省略 asyncValidate, / /异步校验规则 asyncBlurFields: ['username'] / /重点在这,可以指定哪几个表单项失去焦点时触发验证 })(AsyncValidationForm);
表单联动 表单联动需要用connect()方法将表单的values与redux store相关连。
1
2
3
4
5
6
7
8
9
10
11
12
13
14
15
16
17
18
19
20
21
22
23
24
25
26
27
28
29
30
31
32
33
34
35
36
37
38
39
40
41
42
43
44
45
46
import {Field, reduxForm, formValueSelector} from 'redux-form' ;<div> <label htmlFor="hasEmail" >Has Email?</label > <div> <Field name="hasEmail" id="hasEmail" component="input" type="checkbox" /> </div> </ div>{ hasEmailValue && <div> <label>Email</label> <div> <Field name="email" component="input" type="email" placeholder="Email" / > </div> </ div>} SelectingFormValuesForm = reduxForm({ form: 'selectingFormValues' })(SelectingFormValuesForm); const selector = formValueSelector('selectingFormValues' ); SelectingFormValuesForm = connect(state => const hasEmailValue = selector(state, 'hasEmail' ); const favoriteColorValue = selector(state, 'favoriteColor' ); const {firstName, lastName} = selector(state, 'firstName' , 'lastName' ); return { hasEmailValue, favoriteColorValue, fullName: `${firstName || '' } ${lastName || '' } ` } })(SelectingFormValuesForm); export default SelectingFormValuesForm;
这里有一条警告:此方法要慎用,因为每次change会引发要重绘。react性能虽然牛逼,但也不要故意给它施加压力。
与React插件库搭配使用 这里只举一个DateTimePicker的例子,其他的正常使用即可。
首先,要引入组件库的依赖:
1 2 3 4 5 6 7 8 9 10 11 12 13 14 15 16 17 18 19 20 21 22 23 24 25 26 27 28 29 30 31 32 33 34 35 36 37 38 39 40 41 42 import DateTimePicker from 'react-widgets/lib/DateTimePicker' ;import moment from 'moment' ;import momentLocaliser from 'react-widgets/lib/localizers/moment' ;momentLocaliser(moment); const renderDatePicker = (props ) => { const input = props.input; return ( <DateTimePicker name={input.name} onBlur={input.onBlur} onChange={input.onChange} value={(input.value && new Date (input.value)) || null } className="mid-text" format="YYYY-MM-DD HH:mm:ss" /> ); }; <li> <span className="text" >开始时间:</span> <div className="time-wrapper"> <Field name="startTime" component={renderDatePicker className="time-text" / > </div> <span className="text" style={{ marginLeft: 15 }}> 结束时间:</ span> <div className="time-wrapper" > <Field name="endTime" component={renderDatePicker} className="time-text" /> </div> </ li>
一切正常,对不对?坑在下面:
1
2
3
4
5
6
7
8
9
10
11
12
13
14
15
16
17
18
19
20
21
22
23
export default connect( state => ({ initialValues: { ...state.magics.data, ...(() => const data = state.magics.data; const timeData = { startTime: null , endTime: null , }; if (data) { if (data.startTime) { timeData.startTime = new Date (data.startTime); } if (data.endTime) { timeData.endTime = new Date (data.endTime); } } return timeData; })(), }, }) )(ActivityManage);
这里做一下解释:
正如前文讲默认值的时候所说,此处也会涉及“新增”和“编辑”两种操作,而两个时间字段又非必填,所以,在用initialValues赋默认值时,要用解构的方法,将其他字段的value从state中取出,解构;然后再用一个解构的方法,返回判断后的包含startTime和endTime为key的object,在使用过程中尤其要注意。
其他诸如Field Arrays、Remote Sumit、Immutable JS之类的,见官网吧。
http://redux-form.com/6.7.0/docs/GettingStarted.md/
好了,就到这里啦,白白,下次见~